
Wednesday, August 31, 2011


Tuesday, August 9, 2011
Woke up this morning...
 I woke up this morning and found this guy on my kitchen table! He was unscrewing the cap on the salt shaker...
Tuesday, May 3, 2011
Update: Heroic Male

Eventually, this will become al'Lan Mandragoran from the Wheel of Time series. I am a big WoT fan, so naturally a lot of my artistic ideas are inspired by the epic. Hopefully some who see my stuff are familiar with the series.
Details to come.
Of course... the hadori.
Wednesday, March 23, 2011
Recluse Mech: Rig Demo

Monday, March 21, 2011
an Om Sunrise
This is essentially the same as the previously posted "Om". However, this is the completed piece. There are 3 pieces of geometry, the 2 hills and the sun sphere. The grasses, flowers, and sun rays are all Maya pFX. The atmosphere and the clouds which used to be a static image background are a now a field of fluid dynamics to allow for a better animation and color change as the sun rises. It may seem a bit more CG, but stylistically I like it better this way. I hope you enjoy!
Monday, March 14, 2011
an Om, from me, for you.
Created in Maya with Paint FX. The hills and the sun are polygons. The sun rays and the grasses are pFX. The sky is a ever-so slightly transparent (to allow the sun rays through) polygon with a sky map.
Monday, March 7, 2011
Recluse Mech - FK controls preview
 Here's a quick look at what I've done with the FK controls. The hardest part is done. I've yet to add the rotational controls for the knees and hips, but the feet and toes took the most work and they are finished.
Connections between IK and FK switches and the opposite switch's visibility is yet to come.
Recluse Mech- IK controls preview
Here is a small preview of the IK controls for the mech. I haven't added FK controls yet, but the IK is pretty much complete, so the FK should be easy enough to add now. After this its expressions and SDK =)
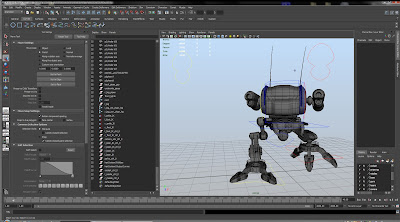
On another note, I have a challenge with some soft/stretch parts of the mesh and having it stick to the joints the way I want it to. Its been pretty much hit and miss experimentally speaking, but I'm sure I'll work out something soon.

On another note, I have a challenge with some soft/stretch parts of the mesh and having it stick to the joints the way I want it to. Its been pretty much hit and miss experimentally speaking, but I'm sure I'll work out something soon.
Saturday, February 19, 2011
The Recluse: Rig

Wednesday, February 9, 2011
Maya 2011 controller orientation workaround
I've created a simple tutorial which shows the workaround for the problem Maya 2011 has with orienting a controller to its children while remaining neutral in world-space. This is an adaptation of Carlo Sansonetti's technique for controller orientation. In this example, I'm setting up a controller for a foot with the rotation axis at the heel for an advanced foot setup.
Unfortunately there is no voiceover for the video at this moment since I do not own a microphone, so hopefully the text will guide you through what you see in the video.
Here is the tutorial:
Unfortunately there is no voiceover for the video at this moment since I do not own a microphone, so hopefully the text will guide you through what you see in the video.
Here is the tutorial:
1.) Basically, I add in the controller, in this case a nurbs circle, then scale it up a bit.
2.) Then I name it and group it twice, one layer is SDK for whatever sdk controls for later, the top group is the offset group (l_foot_IK_ctrl_O).
3.) I Point Constrain the offset group node (be sure the group is selected, not the shape node) to the ball_jnt.
4.) I then Aim Constrain the offset group node to the toe_jnt.
5.) Next, I delete both constraints, as they are no longer needed, then I shape my controller the way I want it with the shape node CVs.
6.) Next I create a locater node, and parent it to the ball_jnt. I then zero out all the transform attributes for the locater, moving it to and orienting it with the ball_jnt.
7.) Then I go Edit>Unparent the locater, and move it into the place where I want the heel rotation to be.
8.) I select the controller (the shape), hit Insert to move its transform center and hold down V to snap it to the locater, and hit Insert again.
9.) Then I delete the locater node as it is no longer needed at this point. ( you may want to keep it for further snaps and constraints later on down the road though)
Saturday, January 29, 2011
A girl can change her mind can't she?
 After consideration I decided to rig the pyro instead of the scout. See here the skeleton I've set up for him prior to any IK, SDK, or controller added. I don't know why I added joints for the gas tank, I want it to stay rigid when the character bends... we'll see if they're necessary...
Sunday, January 23, 2011
Rig Sheet : Team Fortress 2 Scout
 This quarter I am taking a class called Advanced Animation for Gaming. This weeks project is to plan the layout of a skeletal rig for an existing character mesh. The mesh I've chosen is the Scout from Team Fortress 2.
Here is the general plan. I may decide to revise later with some bone extensions for secondary movement of the necklace and backpack, but right now. I want to keep things simple.

Tuesday, December 21, 2010
The Bodies
So here is what I turned in. I won't say these are finished. Being new to ZBrush without formal training has proven to be a challenge, but one that served as a great learning experience. At this point, both models are at their densest I can comfortably work with them. It is now time to learn retopology during my break between quarters so I can add the detail and refinements I wanted in these sculpts.


It is worth noting that the female mesh was run through Decimation Master at 1% prior to these renders. This was my first attempt at reducing the poly-count so it would be possible to add the detail I want. However, I didn't get quite what I wanted, as the new topology is not ideal for resculpting, so it appears decimation should wait until the end of the sculpting process while retopology can take place earlier in the process. I'll go back retopologize using the high-poly version.


Thursday, December 2, 2010
Updates - Human Sculptures
It's crunch time. I've got two sculptures going simultaneously and I've got to get them refined to the point of appearing natural.
The original mesh that was the female sculpt from last quarter I've scrapped and started anew based on the base of the male mesh. It was a hard and painful lesson, but one well learned. Basically the geometry layout for ZBrush sculpting is quite different from one poly-modeled in Maya. And holes (eyes and mouth) make ZBrush unhappy. It was hard throwing away something I had spent some fair amount of time working on, but ultimately it served as a great learning experience.
I've realized one of the great powers of this type of modeling/sculpting. Something which would be completely unfeasible in Maya was almost too easy in ZBrush; I took my male mesh and made it a female. I did it in one day. Wow, just...wow. Is it possible to be in love with a software program?
Anyways... here is where I'm at. I need to finalize sculpting on these two models and have them looking natural in little over a week. Hands and feet go first, faces next, and then further refinements as seen fit.


The original mesh that was the female sculpt from last quarter I've scrapped and started anew based on the base of the male mesh. It was a hard and painful lesson, but one well learned. Basically the geometry layout for ZBrush sculpting is quite different from one poly-modeled in Maya. And holes (eyes and mouth) make ZBrush unhappy. It was hard throwing away something I had spent some fair amount of time working on, but ultimately it served as a great learning experience.
I've realized one of the great powers of this type of modeling/sculpting. Something which would be completely unfeasible in Maya was almost too easy in ZBrush; I took my male mesh and made it a female. I did it in one day. Wow, just...wow. Is it possible to be in love with a software program?
Anyways... here is where I'm at. I need to finalize sculpting on these two models and have them looking natural in little over a week. Hands and feet go first, faces next, and then further refinements as seen fit.


Thursday, November 18, 2010
Male - Update

Monday, November 15, 2010

Monday, November 8, 2010
Male
This is what I've been working on this week. A male musculature. This is approximately 8 hours worth of sculpting. I thought I'd make a turn around for preview purposes.

Friday, November 5, 2010
The Recluse

This is the mech that I've been working on the last week. I've decided to go with a brown, desert-ish look to it. Its been a bit updated from its original form. I added some organic shapes and detailed it up a bit. That and a weathered texture and here you have The Recluse.

The unfinished model has been on my drive forever. Its a good feeling to see it completed. Modeled in Maya. Textured in ZBrush with Polypaint. Rendered with Mental Ray.
Thursday, November 4, 2010
A quick sketch

A quick sketch of Nynaeve. I was bored and tired of messing with Zbrush. I was having this thought today: I wonder how many students use the default meshes the Pixologic provides and then builds their "character" from that mesh. I also wonder: Is that cheating? Personally, I believe it is. However, I wonder how often such a thing is overlooked in the academic world, since such variation can come from them. I mean. you could morph the dog mesh into a human if you so desired. Just something I was wondering... my meshes are mine from beginning to end. They might spend a long time being ugly or broken, but damnit they're mine. I was thinking to turn my female mesh into the sketch you see here. That is... once I fix the mesh and learn how to sculpt.
I've been away from 3D CG for a few years with work so I'm new to the whole Zbrush phenomenon; I've always modeled in Maya. The workflow in ZBrush is almost backwards compared to Maya. Or from the middle outwards... or whatever.
I'll get it though. I will. I am.
Wednesday, November 3, 2010
The Towers of Midnight
Book 13 of the Wheel of Time Saga released yesterday. This series is one of the greatest creative influences in my life. If you are unfamiliar, but interested in an epic fantasy series that will influence your life, pick up The Eye of the World by Robert Jordan from your local bookstore.
Subscribe to:
Posts (Atom)